The Ultimate Guide to Instagram Photo Export Settings (2025 Edition)
Instagram has changed again – and if you’re a photographer or creator, you’ve probably had the pleasure of uploading a quality photo only to see that after posting it to Instagram it didn’t look as great as it did in your camera roll. We all go through it, but today is fortunately the last time you’ll have to worry about that! In this September 2025 update, I’ll break down the best export settings for Instagram photos. This guide is packed with up-to-date info (have we gotten used to the new 3:4 aspect ratio yet?) so your posts look exactly how you intended!
Whether you use Lightroom Classic, Lightroom CC, or Lightroom Mobile, I’ve got you covered.
Why Export Settings Matter for Instagram Quality
Why spend hours capturing and editing the perfect shot, only for Instagram to mush it up with compression in the end? Instagram compresses images when you upload them, which can lead to blurriness or pixelation. It’s understandable why however, as there is approximately 1.3 billion images posted a day (per Photutorial), but the key is to avoid this by exporting your photos with optimal settings so they survive Instagram’s compression with minimal quality loss.
Here’s why this matters:
Resolution & Size: Instagram limits image resolution to about 1080px width* for feed posts . If your photo is larger, Instagram will resize it down (and possibly over-compress it). By exporting at the right dimensions, you stay in control of the resizing.
Compression: A large file (over ~8 MB) will get heavily compressed by Instagram. Proper export settings can keep file size in check without visible quality loss.
Aspect Ratio: If your photo’s aspect ratio isn’t one Instagram supports, the app will crop or add borders. Using the correct ratios when exporting ensures your composition isn’t ruined.
In short, the better you prep your image, the better it will look once posted.
What’s New in 2025: Updated Aspect Ratio & Quality Features
Big news: Instagram now supports photos with a 3:4 aspect ratio (width:height) in the feed! For years, the tallest vertical image you could post was 4:5 (think 1080px by 1350px). As of mid-2025, you can go even taller – 3:4 (which in pixels is 1080px by 1440px for a portrait image). According to Instagram head Adam Mosseri, if you upload a 3:4 photo, “it’ll now appear just exactly as you shot it,” since most phone cameras shoot 3:4 by default. In other words, no more slight cropping of your vertical shots to fit 4:5 – your full 3:4 image can be displayed in the feed.
Why does this matter? Screen real estate! A 3:4 image is a bit taller than 4:5, meaning your photo fills more of the viewer’s screen, grabbing more attention. Those extra pixels can make your portraits and lifestyle shots look that much more immersive.
Other 2025 updates and reminders:
“Upload at Highest Quality” Toggle: Instagram has a setting (in Settings > Account > Data Usage on the app) called “Upload at highest quality.” Make sure this is enabled! It tells Instagram to use the best possible quality when posting (especially when on Wi-Fi). It won’t completely avoid compression (your photo still won’t be exactly what you uploaded), but it “will… compress your uploaded photo less than before”. Every bit helps.
Profile Grid Thumbnails: Instagram’s profile grid now displays portrait images in 4:5 ratio (no longer strictly squares) on many accounts. This means if you post a 3:4 photo, the grid might crop the top and bottom a tiny bit to show a 4:5 thumbnail. It’s a minor issue, but something to be aware of. Keep important details toward the center of your image so nothing crucial gets cut off in your profile’s grid view.
Carousels (Multiple Photos): If you’re posting a multi-photo carousel, Instagram still requires all images in the set to share the same aspect ratio. The safest bet is usually sticking with 4:5 for vertical carousels (1080×1350 px), since that was the old standard and ensures consistency. (Carousels haven’t fully caught up to 3:4 yet in all cases.) For single-image posts though, feel free to enjoy the full 3:4 glory. Be sure to add an audio to those carousels as that will allow the post to also show up with Reels, giving a boost to your reach!
Alright, with the new aspect ratio in mind and Instagram’s quality toggle on our side, let’s get into the nitty-gritty: the export settings themselves.
Essential Export Settings for High-Quality Instagram Photos
Before we dive into Lightroom specifics, let’s outline the ideal export settings for Instagram in 2025. Think of this as your quick checklist. We’ll apply these in Lightroom Classic, CC, and Mobile soon.
1. File Format: JPEG (.jpg) – Instagram will convert your images to JPEG anyway, so export to JPEG to begin with for best results. (No, Instagram doesn’t support uploading RAW or TIFF for posts, and PNGs will just get converted to JPEG on upload. Save yourself the trouble and stick to JPEG.)
2. Color Space: sRGB – This is the standard color profile for web and mobile. Instagram displays images in sRGB, so if you upload in another color space (AdobeRGB, ProPhoto, etc.), your colors can look funky/desaturated. Set the color space to sRGB to ensure accurate color on Instagram.
3. Resolution & Dimensions: Aim for 1080 pixels width for all images, since that’s Instagram’s display width on mobile feeds. The height will depend on the aspect ratio:
Portrait (vertical) – Use the new 3:4 aspect ratio, which in pixels is 1080 x 1440px. This gives the tallest, highest-quality vertical image Instagram can show. If you prefer the slightly shorter 4:5, that’s 1080 x 1350px, the choice is yours to make?
Square – 1080 x 1080px (1:1 ratio). This is straightforward; Instagram has long used 1080px squares for posts.
Landscape (horizontal) – Instagram allows widescreen ratios up to about 1.91:1 (a little wider than 16:9). The recommended size is 1080 x 566px for a 1.91:1 landscape photo. If your photo is 16:9, that would be 1080 x 608px. Essentially, set width to 1080 and let height fall where it may (around 566–608px). Pro tip: Landscape posts don’t use as much screen space, so use them only when the scene truly demands a wide frame. Otherwise, vertical or square will generally stand out more.
4. Image Quality (JPEG compression): 80–85% quality is the sweet spot for Instagram. This yields a file that’s significantly smaller than 100% quality but visually almost identical. Many photographers find that around 85% gives an optimal balance. Going to 100% quality can bloat your file size with minimal visible gain – and a huge file will get compressed by Instagram more aggressively. By sticking in the 80s, you’ll stay safely under Instagram’s unofficial ~8MB file size cap while preserving detail. (I typically don’t recommend dropping below ~76% for Instagram use, or you might start to notice slight compression artifacts before you even upload.)
5. Sharpening: Apply Output Sharpening for Screen (Standard). Lightroom’s export can add a final sharpening pass optimized for screen viewing, which helps counteract the softness that resizing and compression can introduce. A “Screen – Standard” setting is a good choice. If your image is super detailed or you really want a crisp look, you could try “High” sharpening, but be cautious as over-sharpening might make the compression artifacts more pronounced. “Standard” adds a nice subtle crispness that usually translates well to Instagram’s display.
6. Metadata & Watermark: These don’t affect image quality, so they’re optional and up to you:
Including some metadata (like copyright or contact info) is fine; Instagram will strip out most metadata on upload anyway. If you want privacy, you can also strip exit data on export. It won’t change image appearance or quality.
Watermarks are a personal choice. A small watermark won’t hurt image quality if done right, but it can be a visual distraction. My take: Instagram already shows your username with your post, so a heavy watermark on the photo itself might be overkill. Especially considering we’re currently living with AI technology at our fingertips, and if someone was going to steal you photo then they can remove the watermark in seconds anyway, that’s why I stopped. I just report posts that use my photos without permission or credit, and Instagram does a fantastic job with getting them removed.
Now, how do we apply these settings in Lightroom? Let’s go step-by-step for each Lightroom platform (Classic, CC, and Mobile). Feel free to skip to the version you use!
Exporting from Lightroom Classic (Desktop)

Lightroom Classic export settings for sharp Instagram posts. JPEG in sRGB at quality 85. Portrait 3:4 at 1080 x 1440 with Sharpen for Screen set to Standard. Save as an export preset to speed up your workflow.
If you’re using Adobe Lightroom Classic, here’s how to dial in the best Instagram export settings:
Crop to the Right Aspect Ratio (Before Export): In Lightroom Classic’s Develop module, use the Crop Tool to set your aspect ratio for each photo before you export. Select 4×5 in the aspect ratio dropdown, or 3×4 for the new ratio. This ensures your composition is set for Instagram and you won’t have to crop later in Instagram’s app. Remember, 3:4 will use the full allowed height which is great for portraits, while 4:5 is the previous standard that still works if it flatters your image better. Don’t skip cropping! It’s much better to crop in Lightroom where you can fine-tune, than to have Instagram awkwardly crop it on upload.
Open the Export Dialog: Select your photo (or multiple photos) and click File > Export (or right-click and choose Export). The Export Dialog will appear, full of options.
File Settings: Under File Settings:
Image Format: Choose JPEG.
Color Space: Choose sRGB.
Quality: Set around 85%. You can type 85 or use the slider. (Feel free to go a bit higher if you have tons of fine detail like landscapes, or a bit lower if file size is a concern – but keep it in the 80–100 range for best results. 85% is our go-to.)
Image Sizing: Tick the Resize to Fit box. We’ll specify our target dimensions here:
For Vertical (Portrait) shots: Select “Width & Height” and enter W = 1080 px, H = 1440 px. This means Lightroom will size the image to fit within 1080×1440. A portrait-oriented photo will come out 1080x1440 exactly if it’s 3:4, or 1080x1350 if it’s 4:5 (since 1440 height is taller than needed for 4:5).
Tip: Make sure “Don’t Enlarge” is checked (so Lightroom won’t scale up a smaller photo to those dimensions – usually not an issue unless you cropped something very small).
For Square shots: Use Width = 1080, Height = 1080.
For Landscape shots: Use Width = 1080, Height = 566 (for 1.91:1) or Height = 608 (for 16:9) if you know your crop ratio. Alternatively, you can set Long Edge = 1080 px for any landscape-oriented images. This will make the long side (width, in this case) 1080, and let the height fall accordingly.
If you’re exporting a batch of photos with mixed orientations, you might prefer using Long Edge = 1440 px. This way, any portrait image will get its long side (height) set to 1440, and any landscape will get its long side (width) to 1440. However, 1440px long edge will make landscape images wider than needed (1440px wide, which IG will downsize to 1080px). It’s not catastrophic, but it could invite more compression. So, it’s safer to use 1080 for long edge on landscapes. I ended up creating two separate export presets: one for verticals, one for horizontals. For simplicity, start with your vertical shots first, then do a second export for any horizontal shots.
And remember: Instagram will resize anything above 1080px wide down to 1080px, so there’s no benefit in exporting, say, a 2048px wide image for Instagram. Stick to these recommended sizes and you’ll get the best quality with minimal Instagram interference.
Output Sharpening: Check Sharpen For: Screen and choose Standard amount . This is a mild sharpening that helps counteract the softening from downscaling. If your image is super sharp already or has a lot of contrasty details, Standard is usually enough. If after posting you feel it’s not as crisp as you hoped, you can try High on your next export – but use High sparingly to avoid a gritty look.
Metadata: In the Metadata dropdown, you can choose “Copyright & Contact Info Only” if you want to include minimal info . Or choose “All Metadata” if you don’t mind it being there (Instagram will strip most of it anyway). If privacy is a concern, you can choose “None” to exclude things like camera settings or location. It won’t affect image quality, so this is your call.
Watermark: If you’d like, you can check Watermark and apply a watermark you’ve set up. As mentioned, it’s optional. If you do use one, keep it small and unobtrusive – you want viewers focusing on your photo, not a giant logo. (I typically skip watermarks for Instagram, but do what fits your brand.)
Export: Choose your destination folder and hit Export. Lightroom Classic will generate your JPEG(s) with these settings.
For efficiency, consider saving these settings as a preset in Lightroom Classic’s Export dialog (use the “Add” button on the left side of the Export dialog and name your preset e.g. “Instagram Vertical 1080x1440”). You might create one preset for verticals and another for horizontals. Next time, exporting for Instagram will be a one-click operation.
Exporting from Lightroom CC (Lightroom Desktop Cloud)

Lightroom CC export settings for sharp Instagram posts. Set JPEG and sRGB, quality 80 to 85, Custom size with short side 1080 px, and Output Sharpening set to Screen Standard. Save as a preset for faster exports.
Next up, Lightroom CC – the newer, cloud-based Lightroom that simply goes by “Lightroom” on desktop (not to be confused with Classic). If you’re using Lightroom CC on your PC or Mac, here’s how to export for Instagram:
Crop your photo in the Edit view using the Crop tool, just like we mentioned for Classic. Make sure to set the aspect ratio to 4:5 or 3:4 for portraits, 1:1 for squares, etc., so you know what the final composition will look like on IG.
In Lightroom CC, click the Share icon (it looks like a rectangle with an arrow, usually top right) or go to File > Export. Select “Export Photo” (or “Export…”). A side panel or dialog will appear with export options.
File Type: Choose JPEG.
Dimensions: Choose the option to resize. Lightroom CC may offer presets like “Small (2048px)” or “Full Size.” Instead, choose Custom dimensions. Enter the Long Edge = 1440 pixels for vertical shots (or 1080 for long edge if you only export landscapes). This works similarly to Classic – if the photo is portrait orientation, the long edge is the height, so it’ll make it 1440px tall (width auto to 1080px for 3:4 or ~1152px for 4:5). If the photo is landscape, long edge = 1440 will actually set width to 1440. So: if exporting a mix, you might need to do separate runs or just set 1080px for long edge to be safe for all.
Alternatively, Lightroom CC might let you specify exact width and height. If so, use the same values: 1080w x 1440h for vertical. The key is not to exceed 1080 on the shorter side.
Quality: Set the JPEG quality slider to around 80-85% (Lightroom CC uses a similar scale 0-100). This ensures a high-quality image without an excessive file size.
Color Space: Ensure it’s sRGB. Lightroom CC typically defaults to sRGB for JPEG exports, but double-check under advanced options if available.
Output Sharpening: Lightroom CC might hide this under “More Options” or a gear icon. If available, set Sharpen For Screen and Standard amount, just like in Classic.
Metadata/Watermark: If you have options here, you can include or exclude metadata, and add a watermark if desired, similar to Classic. In many cases, Lightroom CC’s export is simplified, so these might not be prominently exposed, but you can usually find a watermark toggle.
Export the photo to your desired destination.
Since Lightroom CC is tied to the cloud, you could also use the Lightroom mobile app (if you’re synced) to directly share, but exporting gives you a file you can examine. Once exported, transfer the image to your phone if needed (AirDrop, Dropbox, USB — just avoid any method that might compress it, like some messaging apps).
Exporting from Lightroom Mobile (iOS/Android)
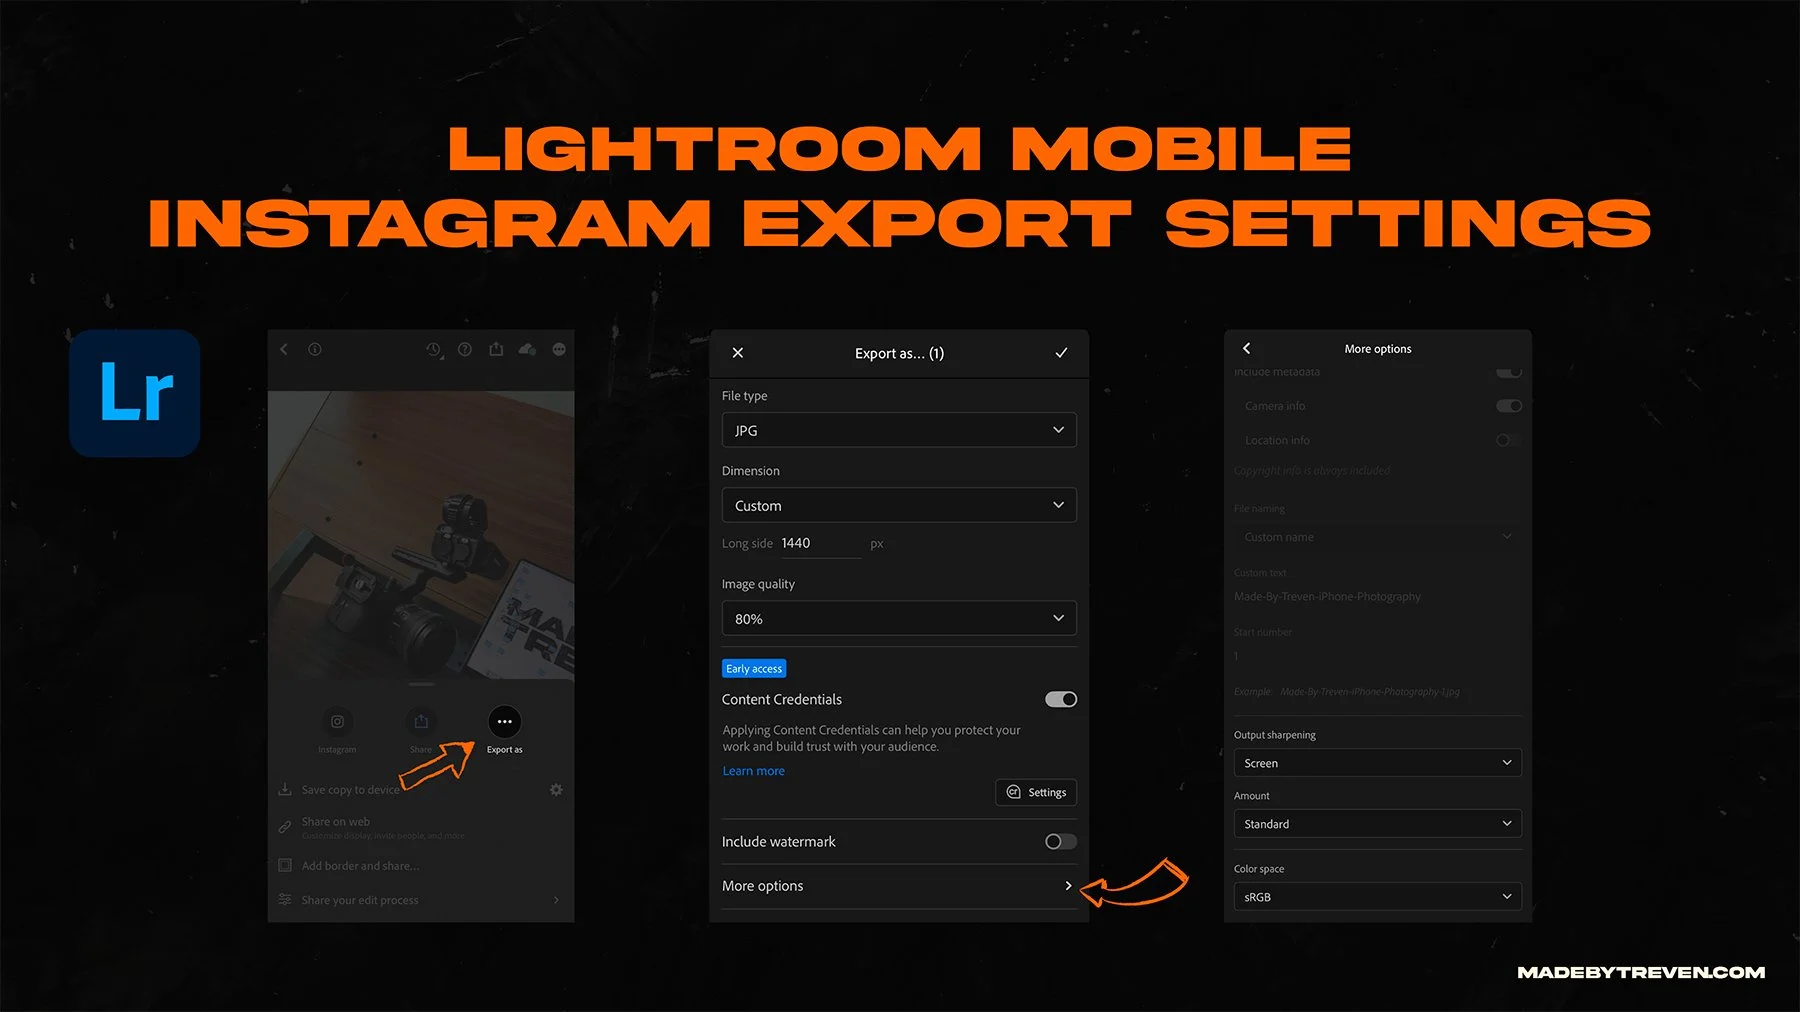
Lightroom Mobile export path: Share → Export As → JPG. Set long edge to 1440 for vertical posts, quality to 80–85, Output Sharpening to Screen Standard, and color space to sRGB. Tap More options to reveal sharpening and color settings.
On the go with just your phone? No problem. Lightroom Mobile can export high-quality images too – you just have to tweak a few settings. Here’s how to get the best results from the mobile app:
Prepare the image in Lightroom Mobile’s Edit screen. Use the Crop tool to set the aspect ratio for Instagram (3:4, 4:5, square, etc.), just like I’ve emphasized before. On mobile, you can tap the Crop icon and choose aspect ratios from the menu.
Tap the Share/Export button. In Lightroom Mobile, when viewing your photo, tap the share icon (usually top menu). Do not just use “Save to Camera Roll” without checking settings – that might default to a smaller size. Instead, look for an option like “Export As…” or “Export…”. On iOS, it’s “Export As” after tapping the Share icon, where you can specify file type and size.
In the Export As dialog:
File Type: Select JPG (or JPEG).
Dimensions: Choose Custom and set the long edge to the desired pixel size. For a vertical shot, set Long Edge = 1440 px (this will ensure the height is 1440px). For a landscape, set Long Edge = 1080 px (to ensure width is 1080). If you only have one image at a time, just adjust according to orientation. Lightroom Mobile won’t let you set both width and height explicitly, but by using long edge, you can cover your bases.
Quality: Set the JPEG Quality slider to around 80-85%. This will reduce file size but keep visual quality high – perfect for Instagram.
Color Space: Ensure sRGB is selected (it usually is by default in mobile, but double-check in the options).
Output Sharpening: Tap More Options if needed to find Output Sharpening. Set it to Screen and Standard just like on desktop. (On mobile, the sharpening and metadata options might be tucked away, but they do exist – Adobe has added nearly all export options to mobile now, which is awesome.)
Metadata/Watermark: If you want, include metadata or a watermark. On mobile, there’s a simple watermark toggle – you can create a text watermark in-app if you like. It’s off by default.
Export the photo. Lightroom Mobile will process the image and usually save it to your Camera Roll (or Files, if you specified a location). If it doesn’t automatically save to your gallery, look for a confirmation or the option to “Save Image”.
Double-check the exported photo in your camera roll by zooming in. It should look sharp and have the correct dimensions. (You can usually tap “Info” on the photo to see resolution details, make sure it says 1080 x 1440 or whatever you set, to be sure.)
Post to Instagram: Now open Instagram (make sure that “Upload at highest quality” setting is on here as well, as mentioned earlier ). When you post, Instagram should recognize the 3:4 or 4:5 ratio and not force you to crop. If it appears cropped or zoomed in, tap the expand icon (the two-arrows icon) in the post composer to fit the whole image. You shouldn’t see any warning or extra compression since your image is already at the ideal resolution. Add your caption, hashtags, and you’re good to go!
Additional Tips for Crisp Instagram Posts
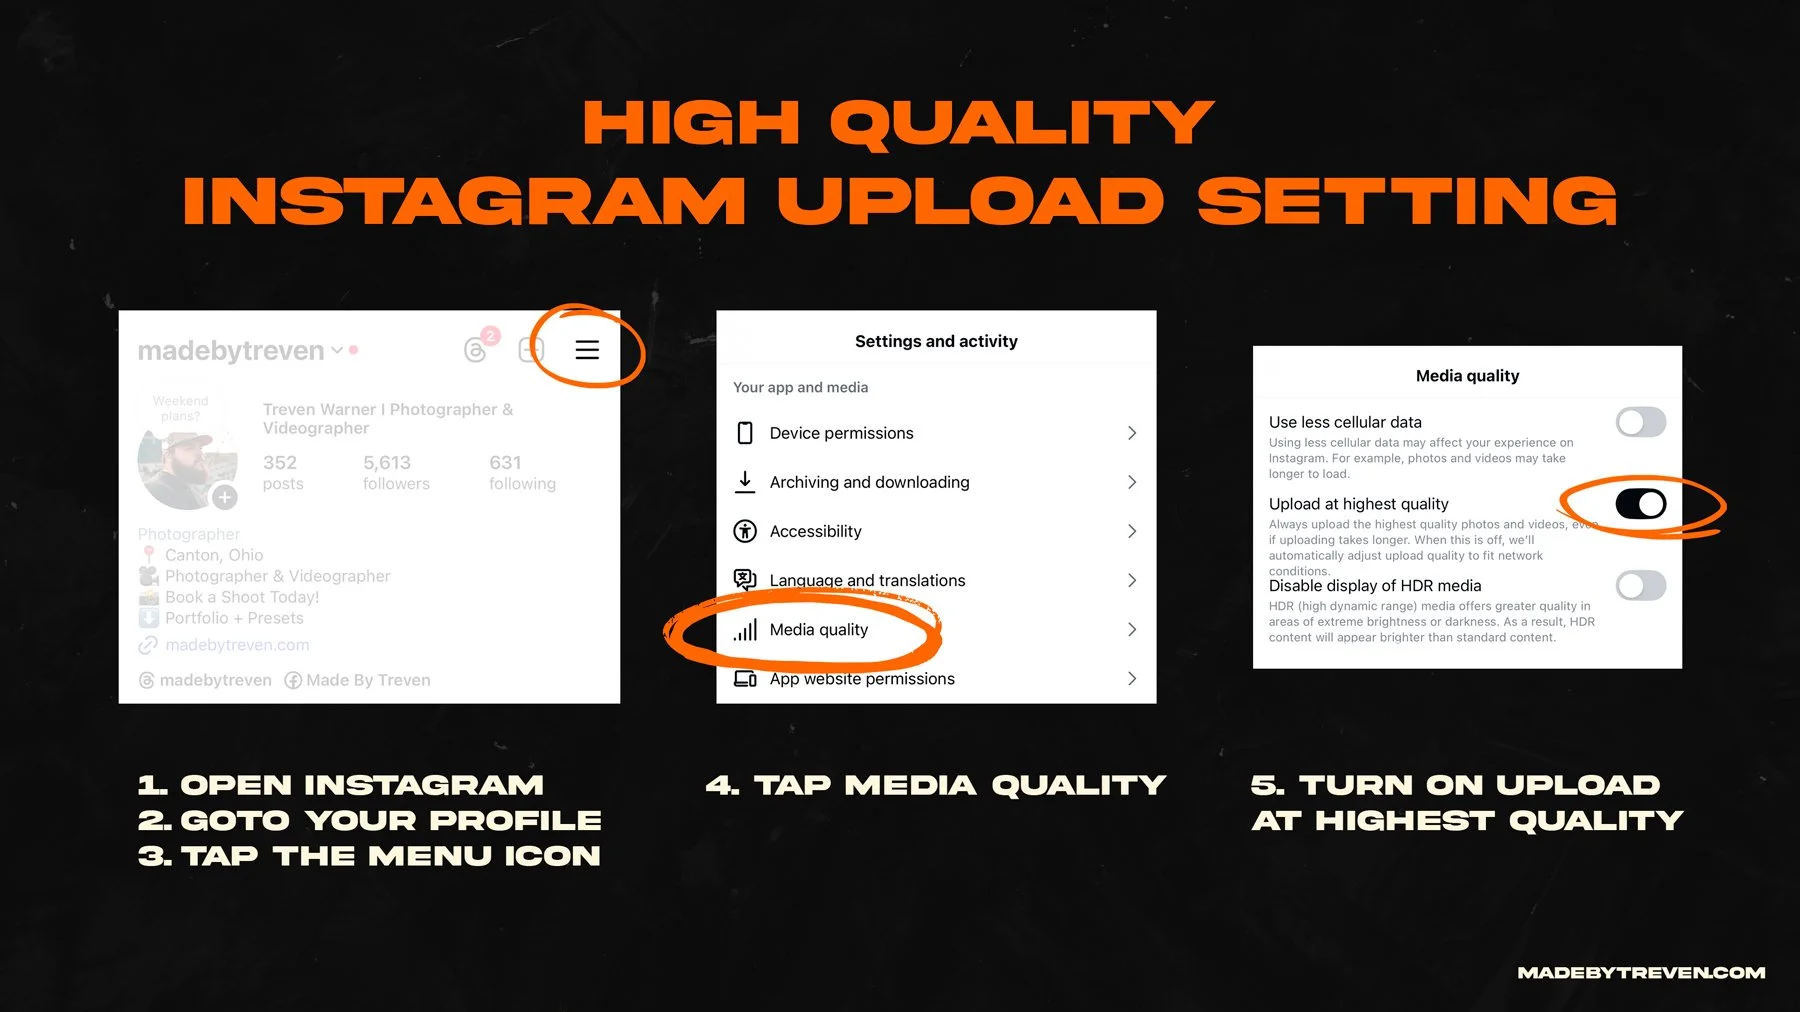
Turn on High quality uploads in Instagram for cleaner photos. Path: Profile menu → Settings and activity → Media quality → Upload at highest quality ON.
Export settings are half the battle. To truly get the best quality Instagram posts, keep these extra tips in mind:
Use the New 3:4 Aspect to Your Advantage: As discussed, 3:4 gives you a taller image in the feed. When cropping, think about how the image will fill the screen. More vertical space = more visual impact. Don’t be afraid to recompose a bit for that ratio. (And if you have an older photo that was 4:5, you might be able to crop it slightly less now to make it 3:4 and include a bit more of the scene, every little bit counts!)
Mind the Composition Safe Zones: If you’re posting a 3:4 image, remember that on your profile grid it might show as 4:5 centered. So avoid placing critical details (like text or subjects’ heads) at the extreme top or bottom of a 3:4 photo – they could be slightly cut off in the grid thumbnail. Keep important elements toward the center, and you’ll be fine in both the feed and your profile grid.
Avoid Over-Editing or Over-Compressing Beforehand: It might be tempting to use other apps or to repeatedly save the image before uploading. Every time you save a JPEG, it compresses again. So do your main edit in Lightroom, export once, and don’t run it through another compression (like sending it through a chat app or email to yourself). The goal is to have one high-quality JPEG export straight to Instagram.
Transfer Photos in Full Quality: If you edited on desktop, how you get the photo to your phone matters. Use methods that don’t compress:
On Mac and iPhone, use AirDrop – it’s quick and preserves full quality (it’s essentially a direct file transfer).
On Windows/Android, you can use a USB cable, or a cloud drive like Dropbox/Google Drive, or messaging apps that have an option to send “Document” or original quality.
Do not screenshot your photo or send it via apps like Instagram DMs or regular text messaging – many of those will downsize or compress images. It’s heartbreaking to nail the export and then lose quality in transit!
If you’re using a scheduling service or social media manager, check that it doesn’t compress your images on upload. Most official Instagram partners will follow the 1080px rule, but it’s good to verify.
Enable “Upload at Highest Quality” in Instagram: We mentioned it before, but it’s worth repeating because it can be buried in the settings. In the Instagram app, go to Settings > Account > Data Usage (or Mobile Data Usage) and make sure High Quality Uploads is on. This ensures Instagram itself isn’t trying to save data by uploading a lower quality version. With this on, Instagram will always upload the best version it can, even if you’re on mobile data (albeit at the cost of using a bit more data).
Timing & Algorithm (Worth Noting): This isn’t about image quality per se, but posting high-quality content when your audience is online can maximize engagement, which in turn might make Instagram show your crisp photo to more people. A great-looking photo deserves to be seen! So pay attention to your posting times and use relevant hashtags – let that sharp image shine far and wide.
Don’t Fear the PNG for Graphics: Okay, this is a niche tip: If you’re posting something like digital art or an infographic with text (not a typical photograph), using PNG can preserve hard edges and text clarity better. Instagram will convert it to JPEG, but sometimes starting with a PNG for graphics can yield a slightly cleaner result after Instagram’s processing. For normal photos, JPEG is absolutely the way to go.
Test and Tweak: Every photo is a bit different. If you notice a particular image didn’t post as nicely (maybe it had a lot of fine detail or gradients and Instagram added artifacts), you can experiment. Some people find success exporting slightly larger (say 1200px wide) or using 100% quality and letting IG handle it. Others swear by uploading at exactly 1080px and ~85% quality to minimize IG’s work. My recommendations here are a blend of widely accepted best practices and the latest updates, but feel free to tweak for your specific needs. The good news is you now have a solid baseline – you’ll likely be very close to optimal and any tweaks will be minor.
By following the settings and tips above, you’re stacking the deck in favor of image quality. Your photos should look tack sharp, properly framed, and color-accurate on Instagram. Instead of wasting your energy stressing about your photos not looking great, you can focus on crafting great content and engaging with your audience.
Presets that actually help (and how I learned to use them)
Great export settings preserve detail. Great editing gives that detail a reason to exist. Consistent edits are what make people recognize your work in two seconds, and that is where Lightroom presets can save time and keep your look tight.
I didn’t start with perfect edits. Back in 2015 I opened Lightroom, and was immediately overwhelmed. My photos never matched the artists I looked up to. Then I tried presets. Not as a magic button, but as a blueprint. I bought a pack, applied a look, and started reverse engineering what it did. Why did this curve make shadows feel cleaner. Why did this HSL move fix weird greens. Why did this split tone make highlights feel cinematic. That process taught me Lightroom faster than any tutorial.
Today I have a full loadout of custom presets I have built over the last decade. I use them the same way I learned them: as a strong starting point, then I dial in exposure, white balance, and HSL to match the scene. That is how you get speed and consistency without every photo looking copy pasted.
How to get the most out of any preset
Apply the preset, then fix exposure first. Get it bright enough to breathe.
Set white balance off something neutral. Presets won’t guess your color temp.
Tweak HSL for problem colors. Greens and reds are the usual troublemakers.
Nudge the tone curve for contrast instead of cranking Clarity or Texture.
Finish with local adjustments. Gradients on sky, brush on subjects, radial for pop.
For carousels, sync edits and then adjust per frame so the set feels unified.
Where presets shine for automotive
Mixed lighting at shows. Shift greens and cyans so paint looks true, not neon.
Night shoots. Curve control keeps blacks rich without crushing detail.
Metallic paint. Subtle HSL and color grading can add depth without fake color.
If you want a fast, cinematic base for cars and lifestyle, I put my look into the Cinematic Automotive Preset Pack. They are the same presets I reach for on real jobs. Start with the preset, do the three tweaks above, and your edits will move faster while still feeling like you.
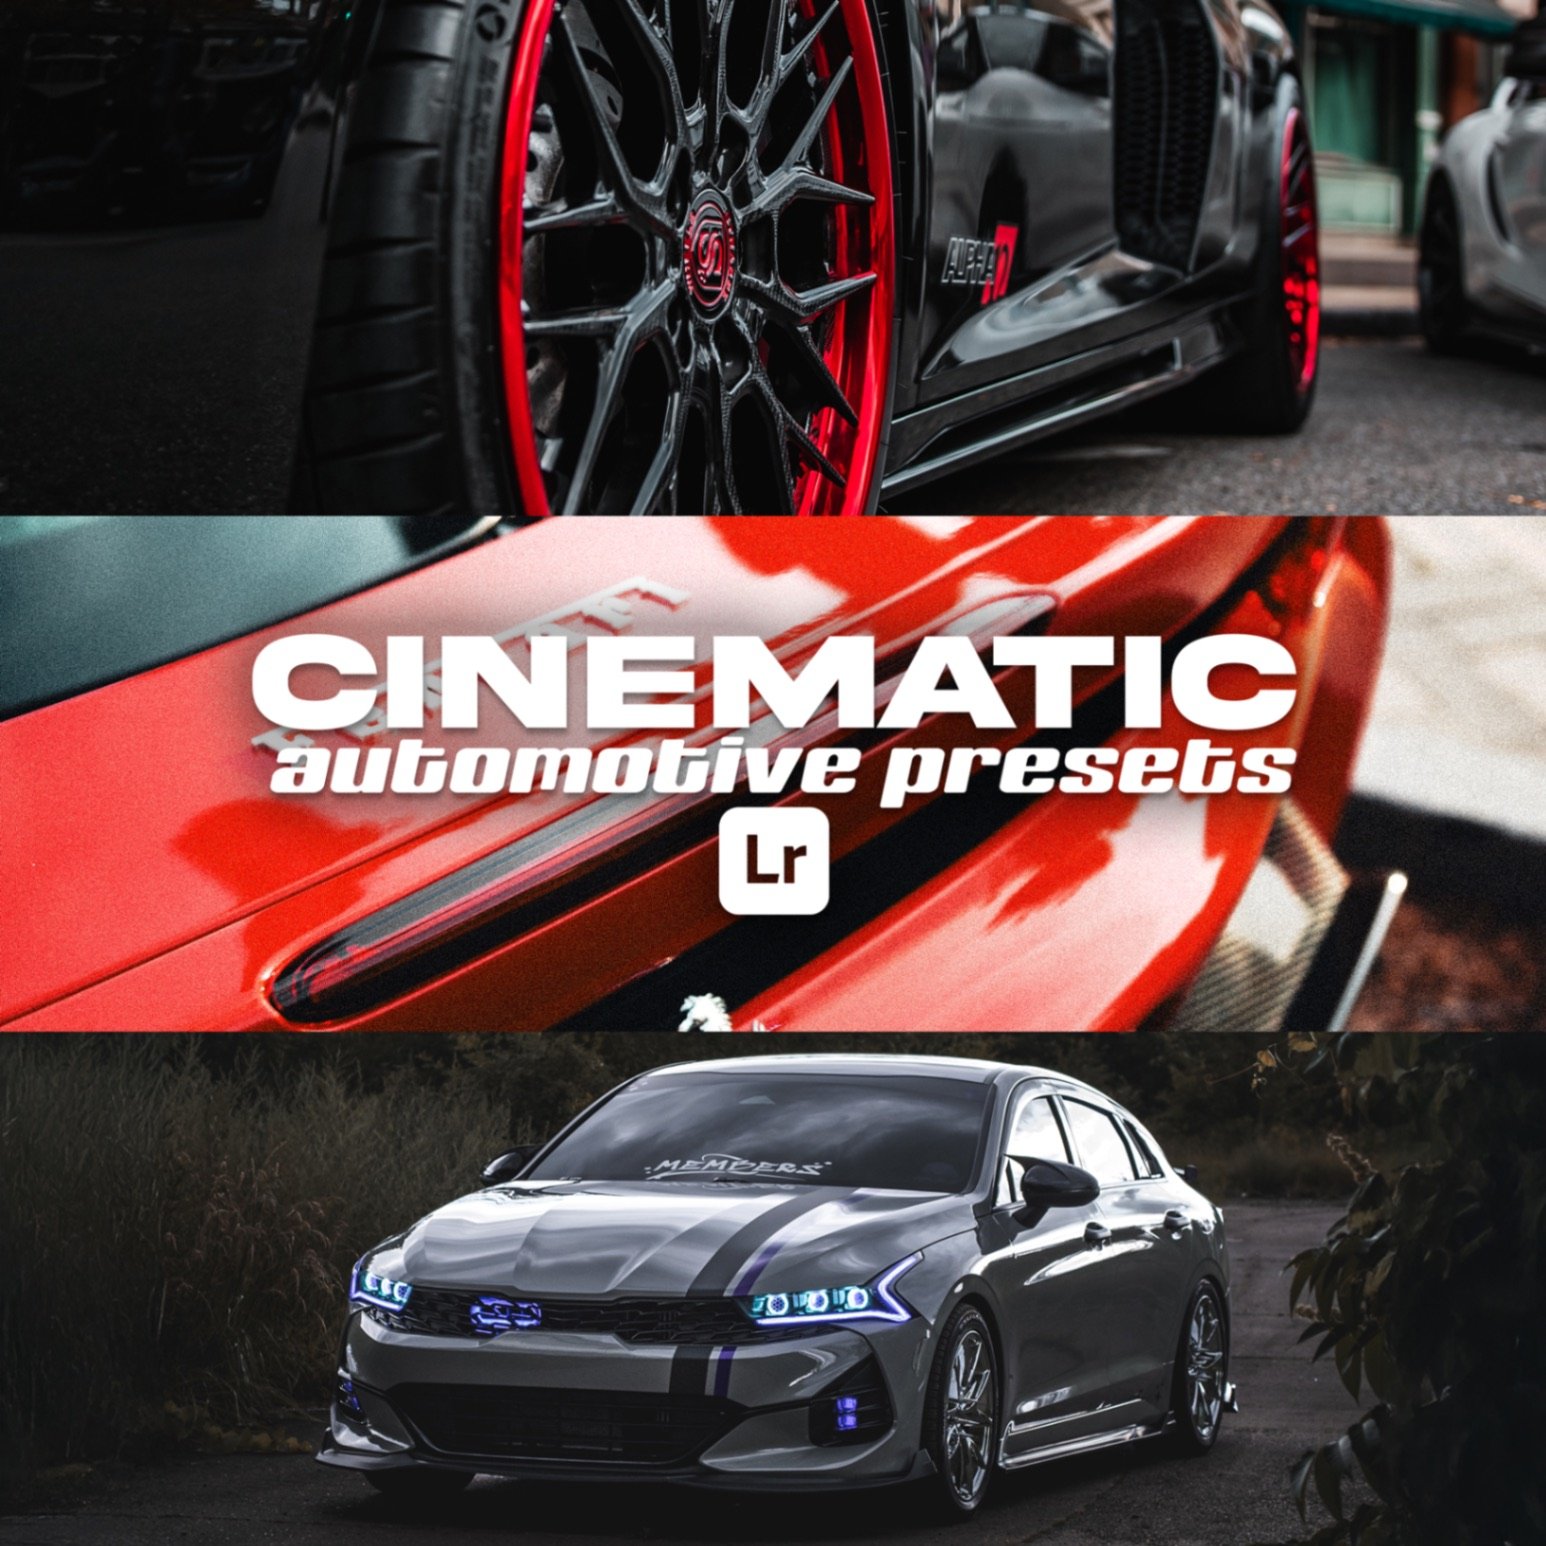
Transform your photos with the Cinematic Automotive Preset Pack – a premium collection of 10 Lightroom presets designed to enhance your images with rich contrast, deep shadows, and a bold cinematic look. While optimized for car photography, these presets work great across a range of styles.
Conclusion: Post with Confidence
You’ve made it through this insta-guide, and now you’re equipped to export Instagram photos like a pro. No more guessing or relying on outdated advice. You have the latest specs, a step-by-step for each version of Lightroom, and a toolkit of tips to ensure your photos look their absolute best on Instagram.
To recap, the winning formula is: JPEG, sRGB, ~85% quality, 1080px wide (use 1080×1440 for vertical), sharpen for screen, and of course make sure to crop to the correct aspect ratio before exporting. It’s all about giving Instagram the file it wants to see, so it doesn’t have to do heavy lifting. You’re basically doing Instagram’s job for it, and it will reward you with a cleaner final post.
Before you go, one more thing: I love helping our fellow creators. If you found this guide useful, consider joining our community by signing up for our email newsletter. I occasionally send out handy resources – like a free downloadable cheat sheet of these export settings, or quick tips when Instagram changes something, because they will change things again, and I’ll be there to decode it. Plus, you’ll get subscriber-only discounts on presets and workshops. Drop your email (we promise to keep the content high-quality, just like your images).
Have questions or extra tips about Instagram export settings? Drop a comment below or shoot me a message.